Diving into the Monero Command Line: Your Beginner's Guide
Monero, the leading privacy-focused cryptocurrency, offers users powerful tools to maintain control over their digital finances. While graphical user interfaces (GUIs) are available, the command line interface (CLI) provides a direct and often more versatile way to interact with the Monero network. For newcomers, the CLI might seem intimidating, filled with cryptic commands and technical jargon. However, with a little guidance, you'll discover that the Monero CLI, specifically monero-wallet-cli, is surprisingly accessible and empowers you with a deeper understanding of how Monero works.
This article will walk you through the essential monero-wallet-cli commands you need to manage your Monero, focusing on sending and receiving XMR, checking your balance, and reviewing your transaction history. We'll break down each command, explain the key parameters, and provide clear examples to get you started. No prior command line experience is necessary – we'll take it step-by-step.
Why Use the Command Line Wallet?
You might be wondering, "Why bother with the command line when there are user-friendly wallets available?" There are several compelling reasons to embrace the CLI, particularly for Monero:
- Enhanced Privacy and Security: The CLI wallet often provides more granular control over your privacy settings. You can directly interact with the Monero daemon (the core Monero software) and fine-tune your connection for optimal privacy.
- Full Control: You have complete control over your wallet and keys. There's no reliance on third-party software interfaces, minimizing potential attack vectors.
- Transparency and Auditability: Every action you take is explicit and visible in the commands you enter and the output you receive. This transparency can be reassuring, especially when dealing with finances.
- Advanced Features: The CLI often exposes advanced features and configuration options that might not be available in GUI wallets.
- Resource Efficiency: The CLI wallet is typically lighter on system resources compared to GUI wallets, making it suitable for less powerful computers or servers.
While the GUI wallets are excellent for everyday use, learning the CLI provides a deeper understanding of Monero and grants you a powerful set of tools for managing your privacy-focused cryptocurrency.
Getting Started: Accessing monero-wallet-cli
Before we dive into commands, let's quickly cover how to access monero-wallet-cli. We'll assume you have already downloaded and installed the Monero software suite, which includes both the Monero daemon (monerod) and the wallet CLI (monero-wallet-cli). You'll need to ensure your Monero daemon is running and synchronized with the network.
To open monero-wallet-cli, you typically navigate to your Monero installation directory in your terminal or command prompt and execute the command:
./monero-wallet-cli
(On Windows, you might omit the ./ and the extension, like monero-wallet-cli.exe).
Once launched, monero-wallet-cli will prompt you to either open an existing wallet or create a new one. If you already have a wallet, you can open it by providing your wallet file name and password when prompted. If you're starting fresh, you can create a new wallet using the guided prompts.
Once you're logged into your wallet, you'll be greeted by the command prompt within monero-wallet-cli, usually indicated by a > symbol. This is where you'll enter the commands we'll explore in this article.

Essential monero-wallet-cli Commands
Now, let's explore the essential commands for managing your Monero from the command line.
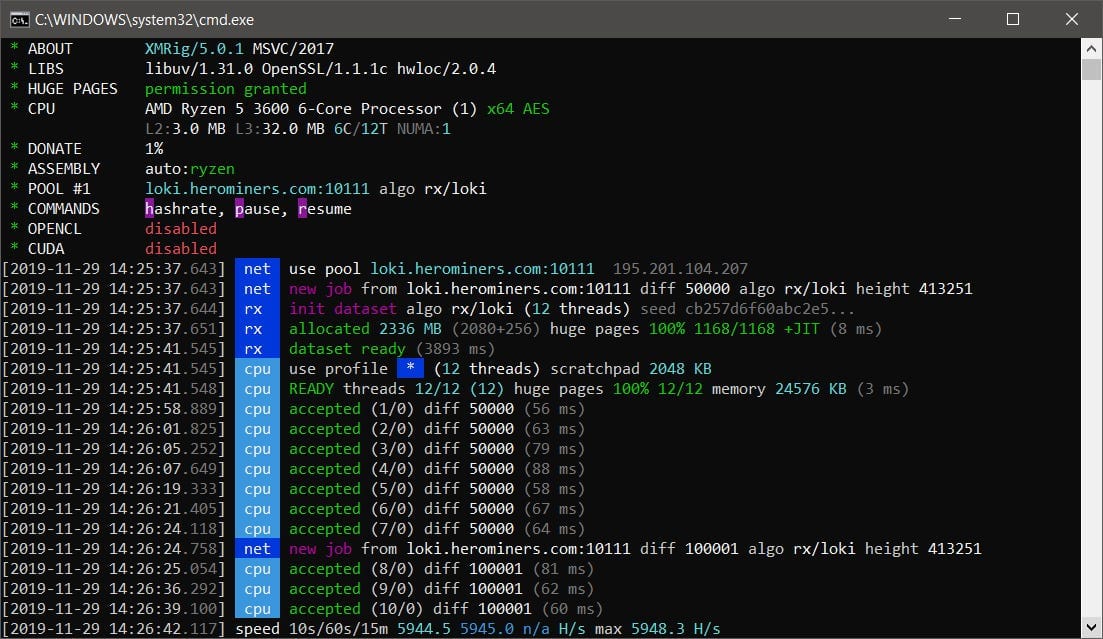
1. Checking Your Balance: balance and show_address
Knowing your balance is fundamental. The balance command is straightforward:
balance
Upon execution, this command will display your wallet's balance, typically showing two amounts:
- balance: This is your total balance, including funds that are still locked due to Monero's privacy features (ring signatures and stealth addresses).
- unlocked_balance: This is the amount of XMR you can currently spend. Monero transactions have a "lock time," and funds become spendable after a certain number of blocks have confirmed the transaction.
You'll see output similar to this:
balance: 10.500000000000, unlocked balance: 9.800000000000
This indicates a total balance of 10.5 XMR, with 9.8 XMR currently available to spend.
Another crucial command for receiving Monero is show_address. To see your primary wallet address, simply type:
show_address
This will display your primary Monero address, which looks like a long string of characters. This is the address you'll share with others to receive XMR.
Primary address: 4<long_monero_address_string>
It's important to note that Monero uses stealth addresses for each transaction, enhancing privacy. Your public address, shown by show_address, is used to generate these unique stealth addresses for each incoming transaction, ensuring that transactions aren't directly linked on the blockchain.
2. Receiving Monero: Sharing Your Address
Receiving Monero is as simple as sharing your address generated by show_address. When someone wants to send you XMR, provide them with this address. They will use this address in their wallet software to initiate the transfer.
You don't need to run any specific command to "receive" Monero in the CLI wallet. As long as your wallet is running (or you open it later), any transactions sent to your address will be automatically detected and credited to your balance once they are confirmed on the blockchain.
3. Sending Monero: transfer
The transfer command is used to send Monero to another address. It's a powerful command with several parameters, but we'll focus on the essential ones for beginners. The basic syntax is:
transfer <address> <amount>
<address>: This is the recipient's Monero address where you want to send XMR.<amount>: This is the amount of XMR you want to send.
Example: Let's say you want to send 2.5 XMR to the address: 4<recipient_monero_address_string>. You would use the command:
transfer 4<recipient_monero_address_string> 2.5
After entering this command, monero-wallet-cli will prompt you to confirm the transaction. It will display details like the recipient address, amount, transaction fee, and ask you to confirm with yes or no. Always double-check the recipient address before confirming! Sending XMR to the wrong address is irreversible.
Advanced transfer Parameters (Optional):
While the basic transfer command is sufficient for most transactions, you can use additional parameters for more control:
-r <ring_size>or--ring-size <ring_size>: This parameter controls the ring size used for your transaction. Ring size is a crucial privacy feature of Monero. It determines the number of decoy outputs mixed with your real output to obscure the transaction's origin. The default ring size is usually sufficient for strong privacy. Increasing the ring size can slightly increase transaction fees and processing time, but it also enhances privacy further. Beginners generally don't need to adjust this.
-d or --destinations <address> <amount> [<address> <amount> ...]: This allows you to send XMR to multiple recipients in a single transaction, which can be more efficient than sending individual transactions.
transfer -d 4<address1> 1.5 4<address2> 0.8
-f <priority> or --priority <priority>: You can set the transaction priority to influence how quickly it gets confirmed on the blockchain. Priorities range from 0 (default) to higher numbers (e.g., 1, 2, 3). Higher priority transactions usually include a slightly higher fee and are processed faster. For most personal transactions, the default priority is sufficient.
transfer 4<recipient_monero_address_string> 1 -f 1
-p <payment_id> or --payment-id <payment_id>: Payment IDs are optional, extra pieces of data you can attach to a transaction. They are often used by exchanges or merchants to identify the purpose of a transaction. If the recipient requires a payment ID, include it using this parameter.
transfer 4<recipient_monero_address_string> 1 -p <payment_id_string>
For most beginners, the basic transfer <address> <amount> command will be sufficient. As you become more comfortable with the CLI, you can explore the advanced parameters for more customized transactions.
transfer 49r8y4xSLmRd2zANQk7sCZD5jmHw4ALvn7j9D3h9y4p7XWp9w9s9y89z9999999999999999999999999999999999999999999999999999999999999999999999999999999999999999999999999999999999999999999999999999999999999999999999999999999999999999999999999999999999999999999999999999999999999999999999999999999999999999999999999999999999999999999999999999999999999999999999999999999999999999999999999999999999999999999999999999999999999999999999999999999999999999999999999999999999999999999999999999999999999999999999999999999999999999999999999999999999999999999999999999999999999999999999999999999999999999999999999999999999999999999999999999999999999999999999999999999999999999999999999999999999999999999999999999999999999999999999999999999999999999999999999999999999999999999999999999999999999999999999999999999999999999999999999999999999999999999999999999999999999999999999999999999999999999999999999999999999999999999999999999999999999999999999999999999999999999999999999999999999999999999999999999999999999999999999999999999999999999999999999999999999999999999999999999999999999999999999999999999999999999999999999999999999999999999999999999999999999999999999999999999999999999999999999999999999999999999999999999999999999999999999999999999999999999999999999999999999999999999999999999999999999999999999999999999999999999999999999999999999999999999999999999999999999999999999999999999999999999999999999999999999999999999999999999999999999999999999999999999999999999999999999999999999999999999999999999999999999999999999999999999999999999999999999999999999999999999999999999999999999999999999999999999999999999999999999999999999999999999999999999999999999999999999999999999999999999999999999999999999999999999999999999999999999999999999999999999999999999999999999999999999999999999999999999999999999999999999999999999999999999999999999999999999999999999999999999999999999999999999999999999999999999999999999999999999999999999999999999999999999999999999999999999999999999999999999999999999999999999999999999999999999999999999999999999999png)

### 4. Viewing Transaction History: `show_transfers`

To review your transaction history, use the `show_transfers` command. By default, it shows all transactions – both incoming and outgoing.

```bash
show_transfers
This command will display a list of your transactions, including:
- Direction:
infor incoming transactions (received XMR),outfor outgoing transactions (sent XMR). - Amount: The amount of XMR involved in the transaction.
- Payment ID (if any): If a payment ID was used, it will be displayed.
- Txid: The transaction ID, a unique identifier for each transaction on the blockchain.
- Height: The block height at which the transaction was included in the blockchain.
- Timestamp: The date and time of the transaction.
- Confirmations: The number of confirmations the transaction has received.
You can filter the transaction history using parameters:
failed or --failed: To show failed transactions:
show_transfers failed
pending or --pending: To show pending transactions (transactions that have been broadcast but not yet confirmed):
show_transfers pending
out or --out: To show only outgoing transactions:
show_transfers out
in or --in: To show only incoming transactions:
show_transfers in
Example: To see only your outgoing transaction history:
show_transfers out
This will provide a list of all transactions where you sent Monero from your wallet. Examining your transaction history is useful for tracking your spending and verifying that transactions have been processed correctly.
Tips for Using monero-wallet-cli
- Start Small: When first experimenting with sending XMR via the CLI, start with small amounts to get comfortable with the process.
- Double-Check Addresses: Always, always, double-check the recipient address before sending any Monero. Incorrect addresses can lead to permanent loss of funds. Copy and paste addresses whenever possible to avoid typos.
- Keep Your Seed Phrase Safe: Your seed phrase is the key to your wallet. Store it securely offline. If you lose your seed phrase, you lose access to your Monero.
- Use a Reputable Node: Ensure your
moneroddaemon is connected to a reliable and trustworthy node. This is crucial for privacy and security. You can configure your wallet to connect to your own full node for maximum privacy and control. - Explore Further: The commands we've covered are just the tip of the iceberg.
monero-wallet-clioffers many more commands for advanced wallet management, subaddresses, multisignature wallets, and more. Typehelpin themonero-wallet-cliprompt to see a full list of commands and their descriptions.
This video tutorial provides a visual walkthrough of using the Monero CLI, which can be a helpful supplement to this article.
Visual Feedback and Confirmation
Using the CLI isn't just about typing commands; it's also about observing the feedback and confirmations you receive. When you execute a command like transfer, monero-wallet-cli provides clear output, showing the transaction details, fees, and confirmation prompts. This visual feedback is essential for ensuring you're performing the intended actions correctly.
Pay close attention to these confirmation screens. They are designed to prevent accidental transactions and ensure you are fully aware of the details before broadcasting a transaction to the Monero network.
Conclusion
The Monero command line interface might seem daunting at first, but it's a powerful and efficient tool for managing your Monero with enhanced privacy and control. By mastering these essential commands – balance, show_address, transfer, and show_transfers – you've taken your first steps towards becoming a proficient Monero CLI user.
Embrace the command line, experiment with these commands, and explore the wealth of features monero-wallet-cli offers. As you become more comfortable, you'll appreciate the direct control and deeper understanding of Monero that the CLI provides. Remember to always prioritize security, double-check addresses, and keep your seed phrase safe. Happy Monero-ing!