Your Beginner's Guide to Running a Local Monero Node on macOS

Welcome to the world of Monero! If you're looking to take control of your digital privacy and dive deeper into cryptocurrency, running your own Monero node is a fantastic step. This guide will walk you through setting up a local Monero node on your macOS computer. Don't worry if you're new to this – we'll break it down into simple, easy-to-follow steps.
But first, what exactly is a Monero node, and why would you want to run one? Imagine the Monero network as a bustling city where transactions are constantly happening. A node is like a dedicated record-keeper in this city, independently verifying and storing all the transaction details – the blockchain.
Running your own local node means you become one of these record-keepers. Instead of relying on someone else's node, you're directly participating in the Monero network. This offers several advantages:
- Enhanced Privacy: You're not broadcasting your transactions through a third-party node, keeping your activity more private.
- Increased Security: You're verifying transactions yourself, adding an extra layer of security.
- Network Support: You're contributing to the strength and decentralization of the Monero network.
- Full Control: You have complete control over your Monero experience, without relying on external services.
While it might sound technical, setting up a Monero node on macOS is surprisingly straightforward, especially with the user-friendly Monero GUI wallet. Let's get started!
What You'll Need
Before we begin, make sure you have the following:
- A macOS computer: This guide is specifically for macOS users. It should be running a relatively recent version of macOS (ideally macOS 10.15 Catalina or later).
- A stable internet connection: You'll need to download the Monero software and sync with the Monero network. A broadband connection is recommended.
- Sufficient storage space: The Monero blockchain is constantly growing. At the time of writing, you'll need at least 200GB of free disk space, but it's wise to have even more to accommodate future growth. Running a full node requires downloading and storing the entire blockchain. You can check your available disk space by going to "About This Mac" -> "Storage".
- Patience: Syncing the blockchain can take a significant amount of time, from several hours to even days, depending on your internet speed and computer performance. This is a one-time process, and once synced, your node will stay up-to-date relatively quickly.
Step 1: Downloading the Monero GUI Wallet
The easiest way to run a Monero node on macOS is using the official Monero GUI (Graphical User Interface) wallet. This wallet includes all the necessary tools to run a node and manage your Monero.
- Open your web browser (Safari, Chrome, Firefox, etc.) and go to the official Monero downloads page: https://www.getmonero.org/downloads/
- Find the "GUI Wallet" section. You'll see options for different operating systems.
- Click on the macOS download link. It will likely be labeled something like "macOS (64-bit)". Make sure you are downloading the GUI wallet and not the CLI (Command Line Interface) wallet, as the GUI is much more beginner-friendly.
- Verify the download (Optional but Recommended): For enhanced security, you can verify the integrity of the downloaded file. On the downloads page, you'll find instructions on how to verify the signatures of the files. This ensures that the file you downloaded is genuine and hasn't been tampered with. While optional for beginners, it's a good security practice to get into.
- Wait for the download to complete. The file size might be around 100-200MB, so download time will depend on your internet speed.
Important Security Tip: Always download Monero software from the official website (getmonero.org). Be extremely cautious of downloading from unofficial sources, as they might contain malware or malicious software.
Step 2: Installing the Monero GUI Wallet
Once the download is complete, you're ready to install the Monero GUI Wallet on your macOS system.
- Locate the downloaded file. It will typically be in your "Downloads" folder and will likely be a
.dmgfile (Disk Image file). - Double-click the
.dmgfile. This will mount the disk image and open a Finder window. - Drag the Monero Wallet icon from the mounted disk image to your "Applications" folder. This is the standard way to install applications on macOS.
- Wait for the file copy to complete. This should only take a few moments.
- Eject the disk image. In the Finder sidebar, find the Monero disk image (it will have a Monero icon) and click the eject button (the upward-pointing arrow). Alternatively, right-click on the disk image in the Finder and select "Eject".
- Open the Monero GUI Wallet. Go to your "Applications" folder and find the "Monero Wallet" application. Double-click it to launch.macOS might display a warning message saying "“Monero Wallet” is an application downloaded from the internet. Are you sure you want to open it?". This is a standard macOS security measure for applications downloaded outside the App Store. Click "Open".
Step 3: Setting up Your Local Monero Node
Now that you have the Monero GUI Wallet installed, let's set up your local node.
- Launch the Monero GUI Wallet. If you haven't already, open the "Monero Wallet" application from your Applications folder.
- Choose your language. On the first launch, you'll be asked to select your preferred language. Choose your language and click "Next".
- Wallet Creation / Restore. The next screen will ask if you want to create a new wallet or restore an existing one. For the purpose of setting up a node, you don't need to create or restore a wallet right now. You can simply click "Close Wallet" in the top menu bar (File -> Close Wallet) to proceed with node setup without creating a wallet immediately. You can always create or import a wallet later.
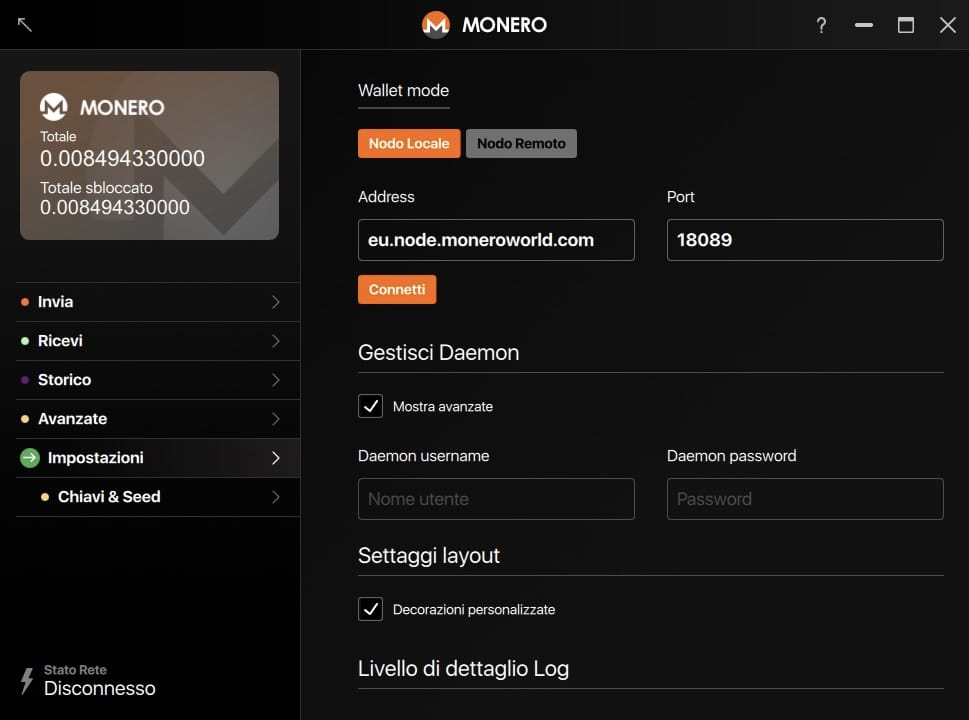
- Node Selection. Now you'll see the "Welcome to Monero" screen. Here you'll choose how you want to connect to the Monero network. You'll see options like "Simple Mode (Recommended)" and "Advanced Mode". Select "Advanced Mode". This will give you more control over your node settings.
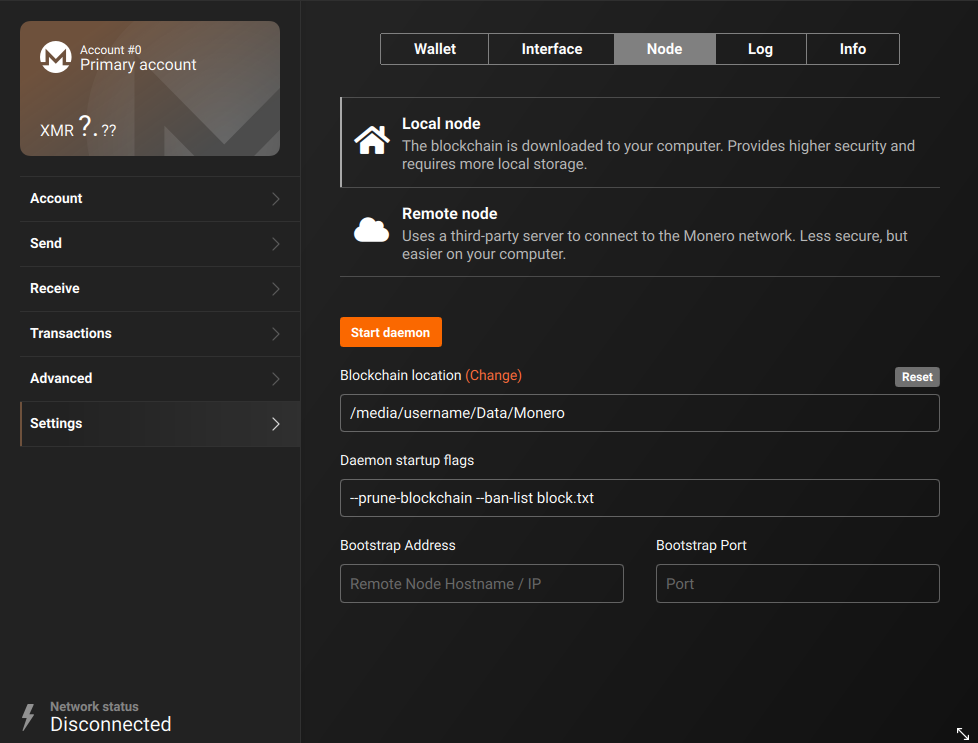
- Node Type Selection. In "Advanced Mode", you'll be presented with options for connecting to a node. Choose "Local node". This is what we want to set up – running the node directly on your computer.
- Data Directory Location. The GUI will suggest a default location for storing the blockchain data. You can usually leave this as the default unless you have a specific reason to change it (e.g., you want to store the blockchain on a different hard drive). Make sure the location you choose has enough free space (at least 200GB, ideally more).
- Bootstrap Node (Optional). You might see an option related to a "bootstrap node". This is an advanced feature that can potentially speed up the initial sync in some cases. For beginners, it's generally safe to leave this option unchecked unless you encounter very slow syncing and want to explore this advanced option later.
- Click "Start Monero". Once you've selected "Local node" and confirmed the data directory, click the "Start Monero" button.

Step 4: Syncing the Blockchain
After clicking "Start Monero", the Monero daemon (the background process that runs the node) will start. The GUI will then begin the process of syncing the blockchain. This is the most time-consuming part of the process.
- Observe the Synchronization Status. In the Monero GUI window, you'll see a synchronization progress bar and percentage. This indicates how far along your node is in downloading and verifying the blockchain. You'll also see information about the current block height and the network block height.
- Patience is Key. Blockchain synchronization can take a long time. It might take several hours or even a day or two depending on your internet speed, computer performance, and the current state of the Monero network. Leave your computer running and connected to the internet while syncing. You can minimize the Monero GUI window and continue using your computer for other tasks, but make sure the Monero application remains running in the background.
- Initial Block Download (IBD). The initial synchronization process is often called the "Initial Block Download" (IBD). During IBD, your node is downloading and processing every block in the Monero blockchain from the very beginning up to the current block.
- Staying Synced. Once the initial synchronization is complete (the progress bar reaches 100% and the GUI indicates "Synchronized"), your node will stay up-to-date automatically. It will download and process new blocks as they are added to the Monero network, which happens approximately every two minutes. This ongoing synchronization is much faster than the initial sync.
- Check for "Synchronized". After the initial sync, regularly check the Monero GUI to ensure it shows "Synchronized" in the bottom left corner. This indicates that your node is fully synced and up-to-date with the Monero network.
This video provides a visual guide on setting up a Monero node, which can be helpful to watch alongside this written guide.
Step 5: Verifying Transactions (and More!)
Once your node is fully synchronized, you can use it for various purposes. One of the most basic is verifying transactions.
- Transaction Verification. If you have a transaction ID (also known as a transaction hash) for a Monero transaction, you can use your local node to verify its details and confirm its inclusion in the blockchain. While the Monero GUI primarily focuses on wallet functionality, your running node is now capable of independently verifying any Monero transaction. For more advanced transaction verification tools, you might explore Monero block explorers that can connect to your local node.
- Using Your Node with Your Wallet (Optional). If you decide to create or import a Monero wallet within the GUI, it will automatically connect to your local node. This ensures that your wallet operations (like checking balances and sending transactions) are done through your own private node, enhancing your privacy and security.
- Contributing to the Network. By running a local node, you are actively participating in the Monero network. You are helping to validate transactions, secure the network, and contribute to its decentralization. Even if you are not actively using your node for transactions, simply running it helps the Monero ecosystem.
Troubleshooting Common Issues
Running a node can sometimes encounter issues. Here are some common problems and how to troubleshoot them:
1. Slow Syncing:
- Internet Speed: A slow internet connection is the most common cause of slow syncing. Ensure you have a stable and reasonably fast internet connection.
- Computer Performance: While Monero nodes are not extremely resource-intensive, a very old or slow computer can impact sync speed. Make sure your computer meets the minimum system requirements for running the Monero GUI.
- Firewall/Antivirus: In rare cases, firewall or antivirus software might interfere with the node's network connection. Temporarily disabling them (carefully!) to see if it improves sync speed can help diagnose this. If it does, you'll need to configure your firewall/antivirus to allow Monero node traffic.
- Blockchain Corruption (Rare): In very rare cases, the blockchain data might become corrupted. If you suspect this, you can try deleting the blockchain data directory (the location you chose during setup) and restarting the node. This will force a full resync from scratch. Be cautious when deleting data and only do this if you are comfortable and understand the implications.
2. Insufficient Storage Space:
- Check Free Space: If you run out of disk space during syncing, the process will likely stall or stop. Check your available disk space (About This Mac -> Storage). You need at least 200GB free, and ideally more.
- Free Up Space: If you are running low on space, you'll need to free up disk space by deleting unnecessary files, applications, or moving data to an external drive.
- Change Data Directory (Advanced): If you have a separate hard drive with more space, you can reconfigure the Monero GUI to store the blockchain data on that drive. This is an advanced option and should be done carefully through the GUI's settings (usually under "Settings" or "Preferences" -> "Node").
3. Connection Issues:
- Check Internet Connection: Ensure your internet connection is working correctly.
- Firewall/Router: Your firewall or router might be blocking connections. Check your firewall/router settings to ensure they are not blocking outgoing connections on the ports Monero uses (usually port 18080 for mainnet). For most home users, this is rarely an issue, but it's something to consider if you are behind a very restrictive network.
- Peer Connection Issues (Rare): Occasionally, there might be temporary issues connecting to peers on the Monero network. Usually, the node will automatically try to reconnect and resolve these issues. Restarting the Monero GUI and your computer can sometimes help in these rare situations.
4. GUI Freezing or Crashing:
- Resource Usage: If your computer is very busy or low on resources, the Monero GUI might become unresponsive or crash. Close unnecessary applications and try restarting the GUI.
- Software Bugs (Rare): Like any software, the Monero GUI might have occasional bugs. Ensure you are using the latest version of the GUI. Check the Monero website or community forums for any known issues and potential updates or workarounds.
If you encounter persistent issues that you can't resolve, the Monero community is a great resource. You can find help on the official Monero website, Reddit communities like r/Monero, and other Monero forums and chat channels.
Congratulations!
You've successfully set up and run your own local Monero node on macOS! You are now a more privacy-conscious and empowered Monero user, contributing to the strength and decentralization of the Monero network.
Running a node is a fantastic way to deepen your understanding of Monero and blockchain technology. Feel free to explore the Monero GUI further, learn about wallet creation and management, and continue your journey into the world of private and secure cryptocurrency. Welcome to the Monero community!