Your Journey to Monero Independence: Running a Local Node on Windows
In the world of cryptocurrencies, Monero stands out for its commitment to privacy and decentralization. A key part of this decentralization is the network of nodes that maintain and validate the Monero blockchain. While you can use Monero by relying on public remote nodes, running your own local Monero node offers significant advantages, enhancing your privacy, security, and contribution to the network's robustness.
This guide will walk you through the process of setting up and running a Monero node on your Windows computer. Don't worry if you're not a tech expert – we'll break down each step into simple, easy-to-follow instructions. By the end of this article, you'll be well on your way to becoming a more self-sufficient Monero user.
Why Run a Local Monero Node?
Before we dive into the how-to, let's briefly touch upon the why. Running a local node might seem like a technical hurdle, but the benefits are well worth the effort:
- Enhanced Privacy: When you use a public remote node, your wallet communicates with that node, potentially revealing your IP address and transaction details to the node operator. With your own node, this communication stays within your control, bolstering your privacy.
- Increased Security: You become less reliant on third-party infrastructure. If a public node is compromised or goes offline, your transactions could be affected. Your local node gives you independence and resilience.
- Network Support: Running a node strengthens the Monero network. More nodes mean greater decentralization, improved transaction verification speed, and increased network stability. You become an active participant in the Monero ecosystem.
- Full Chain Validation: Your node independently verifies every transaction and block on the Monero blockchain, ensuring you are using the most secure and accurate data. You don't have to trust anyone else's version of the blockchain.
Getting Started: Downloading the Monero Software
The first step is to download the official Monero software. It's crucial to get this software from the official source to avoid any security risks.
- Visit the Official Monero Website: Open your web browser and go to https://www.getmonero.org. This is the official website for Monero.
- Navigate to the Downloads Section: On the website, look for a "Downloads" or "Get Monero" section. Click on this to proceed to the download page.
- Choose the Correct Windows Binary: You'll see download options for different operating systems. Locate the section for Windows. You'll typically see several options, including:
- GUI Wallet: This is the graphical user interface wallet, which also includes the node software (
monerod). This is the recommended option for most beginners as it bundles everything you need. - CLI Tools: This is the command-line interface version, intended for more advanced users who prefer to interact with Monero through commands. For this guide, we'll focus on the GUI Wallet option, as it's the easiest to use.
- GUI Wallet: This is the graphical user interface wallet, which also includes the node software (
- Download the GUI Wallet: Click on the download link for the Windows GUI Wallet. Choose the 64-bit version if your Windows system is 64-bit (which is likely if your computer is relatively recent). If you're unsure, you can usually check your system information in Windows settings.
- Verify the Download (Optional but Recommended): After downloading, it's good practice to verify the integrity of the download to ensure it hasn't been tampered with. The Monero website provides instructions and cryptographic hashes (like SHA256) for verifying the downloaded file. While optional for beginners, learning to do this enhances your security practices.
Installing the Monero Software
Once the download is complete, you need to install the software.
- Locate the Downloaded File: Find the
.zipfile you downloaded (it will likely be in your "Downloads" folder). - Extract the Files: Right-click on the
.zipfile and choose "Extract All..." Select a location to extract the files. A good place is directly to yourC:\drive or a dedicated folder on yourD:\drive if you have one. For simplicity, let's assume you extract it toC:\Monero. - Navigate to the Extracted Folder: Open File Explorer and go to the folder where you extracted the files (e.g.,
C:\Monero).
You'll see a number of files and folders within this directory. The key executable for running your node is monerod.exe.
Running monerod.exe for the First Time
Now it's time to launch your Monero node.
- Locate
monerod.exe: In the extracted Monero folder, find the file namedmonerod.exe. This is the Monero daemon, the core software that runs your node. - Run
monerod.exe: Double-click onmonerod.exe. Windows might display a security warning. Since you downloaded the software from the official Monero website, it's safe to run. Click "Run" or "More info" and then "Run anyway" if prompted. - Command Prompt Window: A command prompt window will appear. This is
monerodrunning in the background. Initially, you might see some messages, and then it will start the synchronization process. Do not close this window while you want your node to run. Closing it will stop your Monero node. - Initial Synchronization: The first time you run
monerod, it needs to download and verify the entire Monero blockchain. This process is called synchronization. It can take a significant amount of time – hours or even days – depending on your internet connection speed and computer's processing power. - Observing Synchronization Progress: In the
monerodcommand prompt window, you'll see information scrolling by. Look for lines that indicate synchronization progress, such as "SYNCHRONIZED OK" or percentage progress indicators. You might also see messages about connecting to peers.
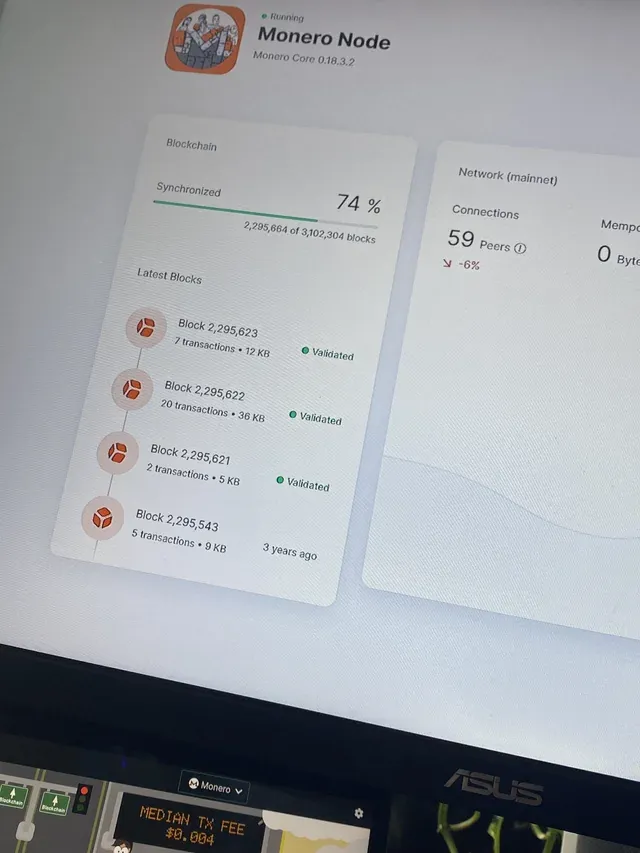
Understanding Blockchain Synchronization
Blockchain synchronization is the process of your node downloading all the blocks of the Monero blockchain from other nodes on the network. Think of it like downloading a very large file, but instead of one source, it's coming from many sources simultaneously.
- Initial Sync is Longest: The initial synchronization is the longest part because your node needs to download the entire history of Monero transactions.
- Catching Up: After the initial sync, your node will only need to download new blocks as they are added to the blockchain, which is a much faster process.
- Resource Intensive: Synchronization can be resource-intensive, using CPU, RAM, disk space, and network bandwidth. Ensure your computer has sufficient resources and a stable internet connection.
Verifying Node Functionality
Once the synchronization process is complete (you'll see a "SYNCHRONIZED OK" message and the prompt will become responsive again), you can verify that your node is running correctly.
- Open a New Command Prompt: Open a new command prompt window (search for "cmd" in the Windows search bar and press Enter).
- Navigate to the Monero Directory: Use the
cdcommand to navigate to the directory where you extracted the Monero software. For example, if you extracted it toC:\Monero, typecd C:\Moneroand press Enter. - Use
monerod.exeCommands: You can now use commands to interact with your running node. Here are a few useful commands:monerod.exe status: This command will show you the current status of your node, including whether it's synchronized, the current block height, and the number of peers connected. Look for "Synchronized: Yes" to confirm synchronization.monerod.exe print_pl: This command will print a list of peers your node is connected to.monerod.exe net_info: This command provides detailed network information about your node's connections.
- Check for Errors: If you encounter errors during synchronization or when using commands, carefully read the error messages in the command prompt window. These messages often provide clues about what might be wrong.
Connecting Your Monero Wallet to Your Local Node
Now that your node is running and synchronized, you can connect your Monero wallet to it. This is where you'll see the privacy and security benefits come into play.
- Open Your Monero Wallet (GUI Wallet): If you downloaded the GUI wallet, open it. If you're using a different Monero wallet, the connection process might vary slightly, but the principle is the same.
- Wallet Settings or Daemon Settings: Look for "Settings," "Daemon Settings," or similar options within your wallet.
- Node Type Selection: You'll typically see options to choose between a "Remote node" and "Local node." Select "Local node."
- Local Daemon Path (If Required): The wallet might automatically detect your local node if
monerod.exeis running in the background. If it doesn't, you might need to manually specify the path tomonerod.exe. This would be the path to themonerod.exefile in your extracted Monero folder (e.g.,C:\Monero\monerod.exe). However, usually, just selecting "Local node" is sufficient. - Start Wallet with Local Node: Save the settings and restart your wallet if prompted. Your wallet should now connect to your local Monero node.
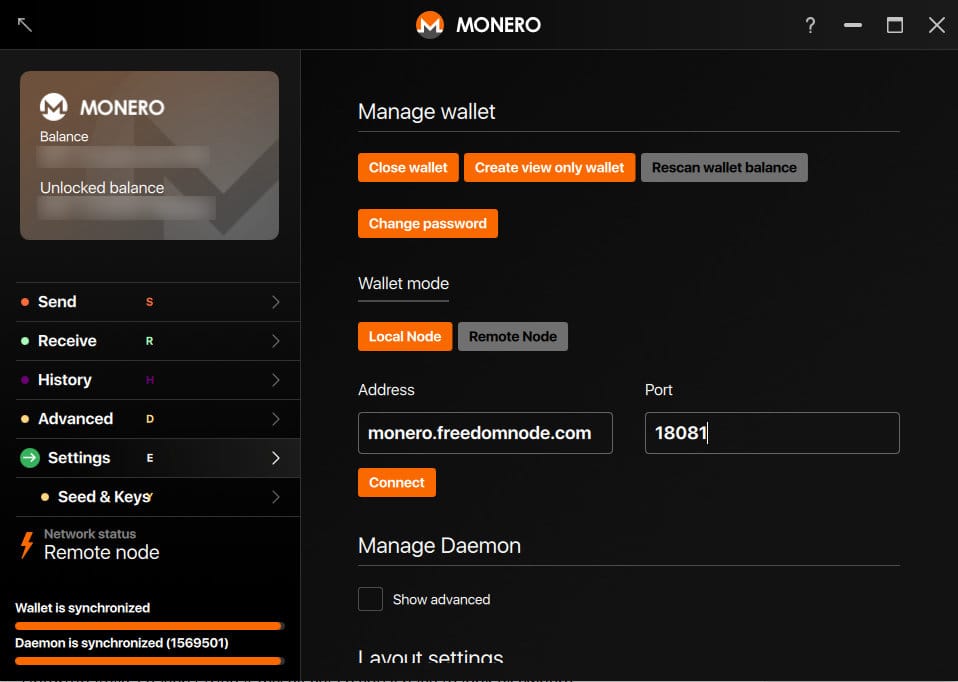
- Verify Connection: In your wallet, check the connection status. It should indicate that you are connected to a local node and that it's synchronized. Transactions you make through your wallet will now be processed through your own node, enhancing your privacy and security.
Troubleshooting Common Connection Issues
Sometimes, you might encounter issues connecting to the Monero network or synchronizing your node. Here are some common problems and how to troubleshoot them:
- Firewall Issues: Windows Firewall or other security software might be blocking
monerod.exefrom connecting to the internet.- Solution: Allow
monerod.exethrough your firewall. You can do this by searching for "Windows Firewall" in the Windows search bar, selecting "Allow an app or feature through Windows Firewall," clicking "Change settings," and then addingmonerod.exeto the allowed apps list, ensuring both "Private" and "Public" networks are checked.
- Solution: Allow
- Port Conflicts: Another program on your computer might be using the same port that
monerod.exeneeds (default port is 18080).- Solution: While less common, you can try changing the default port for Monero. This is a more advanced topic and usually not necessary for beginners. Port conflicts are less frequent than firewall issues.
- Slow Synchronization: Synchronization can be slow if your internet connection is slow or if your computer has limited resources.
- Solution: Ensure you have a stable internet connection. Close other resource-intensive applications while synchronizing. You can also try adding bootstrap nodes to speed up the initial sync (more advanced, look for "bootstrap nodes Monero" online).
- Stuck Synchronization: In rare cases, synchronization might seem to get stuck at a certain percentage.
- Solution: Try restarting
monerod.exe. If that doesn't work, you might need to resynchronize from scratch. To do this, you would need to delete the blockchain data (more advanced, search for "Monero resync from scratch"). As a first step, just restartingmonerod.exeoften resolves temporary issues.
- Solution: Try restarting
- Insufficient Disk Space: The Monero blockchain grows over time. Ensure you have enough free disk space on the drive where you are storing the blockchain data (by default, it's in
C:\ProgramData\bitmoneroor a similar location, though it can be customized).- Solution: Check your disk space. If you're running low, free up space or consider moving the blockchain data directory to a drive with more space (more advanced, search for "Monero change data directory").
Maintaining Your Monero Node's Uptime
To ensure your node continues to provide you with privacy and security, and to support the Monero network, it's important to maintain its uptime.
- Keep
monerod.exeRunning: For your node to be active,monerod.exeneeds to be running continuously in the background. Avoid closing the command prompt window. - System Resources: Running a node consumes system resources (CPU, RAM, disk space, bandwidth). Ensure your computer has enough resources to comfortably run the node alongside your other tasks. If your computer is struggling, you might consider running the node on a dedicated machine or server.
- Regular Updates: Keep your Monero software updated to the latest version. Updates often include bug fixes, performance improvements, and security enhancements. Check the official Monero website for announcements about new releases.
- Power and Internet Stability: Ensure your computer has a stable power supply and internet connection to avoid interruptions in node operation. Consider using a UPS (Uninterruptible Power Supply) if power outages are frequent in your area.
Conclusion: Embrace Monero Independence
Congratulations! You've successfully set up and run your own local Monero node on Windows. By taking this step, you've significantly enhanced your Monero privacy and security, and you're contributing to the strength and decentralization of the Monero network.
While running a node requires some initial setup and ongoing maintenance, the benefits are substantial for anyone serious about using Monero privately and securely. As you become more comfortable with your node, you can explore more advanced features and configurations to further optimize your Monero experience. Welcome to the world of Monero independence!